I'm sat sat home on my day off, trying to decide what to do...the problem is if make-ups not involved it feels like a wasted day!
Theres always some planning or research that can be done, which is vital when completing a succesful shoot/project...so why not plan super in advance?! It'll iron out all the creases and HOPEFULLY mean you avoid any unwanted surprises on the day. And the same goes for learning, youtube is only a few short clicks away where you have access to your favourite make-up artists latest tutorials....so as you can imagine it's impossible to stop thinking about the stuff.
Practice makes perfect, so whatever it is your aiming to achieve, practice, practice, practice and eventually you'll get the result you want! So it looks as if I'll be doing some face designs and general organising!
This may be a slightly pointless post, but here it is any anyway!

Saturday, 16 February 2013

Thursday, 14 February 2013
Perfect Primer
If you want to create a smooth, long lasting foundation base, using a primer is key.
A primer will give your base more staying power, reduce the appearance of fine lines and pores and give you an even base ready for your fave foundation! Primers range from face primer, to eyelid primers and lip primers all of which play a part in completing a perfect make-up!

Here are a few of my favourites:
When creating the perfect base if you have very dry skin make sure you moisturize thoroughly using an oil enriched moisturizer, this will greatly improve the look of your foundation and stop it from sticking to any particularly dry areas!
On the other hand if you have normal/oily skin remember to always set your foundation with translucent powder, focus on the particularly oily areas (but don't use too much it may go cakey!) this will really help with improving the longevity of your foundation.
I got my Smashbox primer samples (including a lid primer) in their 'Try it kit' from www.smashbox.co.uk it's £19 for the kit which includes five minis - the mascara's also amazing!
Anna x
A primer will give your base more staying power, reduce the appearance of fine lines and pores and give you an even base ready for your fave foundation! Primers range from face primer, to eyelid primers and lip primers all of which play a part in completing a perfect make-up!
Here are a few of my favourites:
- Smashbox photo finish primer - £25.00: This is oil free, and contains vitamins A, E and green tea. Primers are Smashbox's specialty, and it shows! I love this one, I have very oily skin and this primer really increases the longevity of my foundation with out giving me too much of a matte finish.
- MAC Prep + Prime Lip- £12.50: This is a clear product which adds moisture to the lips, and creates a more smooth surface for your lip colour. I find it also helps with the application of lip liner, which is also an important part of making your lipstick last longer and stops the colour bleeding into the fine lines around the lips! This is my go to primer for the lips.
- NYX Eyeshadow base - £5.00: It comes in three shades, 'White' (translucent, 'White pearl' and 'Skin tone'. It's important that you prep your lids properly, this will intensify the colour of your eyeshadow, and again give it more stying power. I like to use the skin tone primer, but if your looking for a natural dewy finish, then white pearl would be perfect!
- Smashbox Photo finish hydrating under eye primer - £21.00: Perfect for hydration, blitzing dark circles and puffiness, giving radiance, reducing fine lines and wrinkles, improving skin tone and clarity.
- Benefit Porefessional- £23.50: It has a slight tint to it, which is translucent once applied to the skin, this one really is good at kicking those pores into line and contains vitamin E! It's perfect for oily/combination skin as it's oil free and also works well if you have normal skin, I've also used this one and loved how smooth it made my skin feel before applying foundation.
When creating the perfect base if you have very dry skin make sure you moisturize thoroughly using an oil enriched moisturizer, this will greatly improve the look of your foundation and stop it from sticking to any particularly dry areas!
On the other hand if you have normal/oily skin remember to always set your foundation with translucent powder, focus on the particularly oily areas (but don't use too much it may go cakey!) this will really help with improving the longevity of your foundation.
I got my Smashbox primer samples (including a lid primer) in their 'Try it kit' from www.smashbox.co.uk it's £19 for the kit which includes five minis - the mascara's also amazing!
Anna x
Monday, 11 February 2013
Lime Crime Velvet Love
A post on the only red lipstick you'll ever need!
For a super long lasting, mega vibrant and crazily lushous pout you MUST try Lime Crime's Velvetines (I wish I'd tried it sooner)... It comes in two shades of gorgeous red, is smudge proof (apart from when eating oily food...bad move on my part!), water proof and most definitely party proof...I wore it out for dinner with the boyf where I'd normally avoid red lipstick and then drinks with the girls and it lasted all night!

It goes on wet and dries to a matte finish, which literally won't budge, you could probably sleep in it and it would still be there in the morning (although I wouldn't recommend it!), if however your not a fan of the matte lip you could wear a gloss or balm on top for a different look.

Amazing. Love, love, love.
 |
| Cringy pic, but hey...wear with black liner and flicks! |
I got mine from Cocktailcosmetics.co.uk, but it's that's popular their out of stock again! An alternative is www.limecrimemakeup.com or www.cutecosmetics.co.uk.
Anna :)
Sunday, 10 February 2013
From article to art..
My friend saw this little gem of a nail art idea online and sent it to me, so here's my first attempt, it's such a fab idea, and so much easier than it looks!
All you need is nail varnish for your base colour (a light colour is probably best); some alcohol, vodka or surgical spirit is fine; An old newspaper and top coat/clear nail varnish.

1. Paint your nails with your chosen colour, I used Illamasqua nail varnish in 'load'.
2. Once your nails are dry dip them in the alcohol.
3. Then take the section of news paper you're going to use to make the print (it needs to be big enough to cover the entire area) and press it onto the nail.
4. Slowly peel off the paper.
5. Gently paint over a generous amount of top coat, (I got mine from Sparkly Nails) being careful not to smudge the design. This will help it last longer and stop the design from being rubbed off!
And finally...go and show off your new nails!
Wednesday, 23 January 2013
Lip Land..
This is just a little post about a competition I recently entered, that the very talented international make-up artist Karla Powell put on, any one living in the UK could enter, and the whole thing was meant to inspire and encourage creativity from her fellow & aspiring make-up artists. The inspiration was to be taken from her colour run lip series, a series she did using different colours and textures to create bold and striking images. Here's an image of the original colour run lip series by Karla, and what the competition was based on:

Being a budding make-up artist myself I thought I'd give it a go; and so I created two designs based on my interpretation of Karla's colour run lips. I posted the second design, which in hindsight I actually really don't like! But it was the first design I'd done which was noticed by Karla, the design which I originally thought wasn't good enough to be entered!
My entry was a nearly matte pink lip blending into light pink/almost white in the middle, to add a little twist I used MUA constellation beads, clear constellation beads, glitter dust and sequins to create a snowy effect....this little spark of inspiration was down to the heavy snow in the UK (which I'm sure most of you have experienced this past week) I thought it would work well with the colour run theme!! To create a link between the 'snow' and colour run I used sequins with a touch of pink in them and some purple/pink constellation beads, this was to be the main colour run aspect!
I actually ended up coming third! Which I'm still shocked about, there were so many amazing entries and I just looked at it as a bit of fun and another opportunity get creative as that's what I love to do! I had no pre-conceptions of winning, but it goes to show you should believe in your work!
I'd just like to add, that even if you don't think your work will be good enough, if you've put thought, time and effort in, believe in your work and do it anyway! I did, and it paid off, I've always been shy about entering competitions, but I've realized that you really don't have anything to loose, if it doesn't turn out how you hoped the chances are people will forget it, so there's no need to worry, you'll have learned something from the experience; and when it goes well, you'll be thankful for all the hard work you put in, it gives you such an amazing confidence boost, and the motivation to keep pushing forward :). I'm not saying that if you do something as an after thought, rush it and then think it's rubbish that it won't be, the chances are it probably is! The key is hard work, love and passion!
Anna :)
Here's a link to my facebook page and twitter account:
www.facebook.com/annabaxtermakeupartistry
https://twitter.com/AnnaRhiannon

Being a budding make-up artist myself I thought I'd give it a go; and so I created two designs based on my interpretation of Karla's colour run lips. I posted the second design, which in hindsight I actually really don't like! But it was the first design I'd done which was noticed by Karla, the design which I originally thought wasn't good enough to be entered!
My entry was a nearly matte pink lip blending into light pink/almost white in the middle, to add a little twist I used MUA constellation beads, clear constellation beads, glitter dust and sequins to create a snowy effect....this little spark of inspiration was down to the heavy snow in the UK (which I'm sure most of you have experienced this past week) I thought it would work well with the colour run theme!! To create a link between the 'snow' and colour run I used sequins with a touch of pink in them and some purple/pink constellation beads, this was to be the main colour run aspect!
I actually ended up coming third! Which I'm still shocked about, there were so many amazing entries and I just looked at it as a bit of fun and another opportunity get creative as that's what I love to do! I had no pre-conceptions of winning, but it goes to show you should believe in your work!
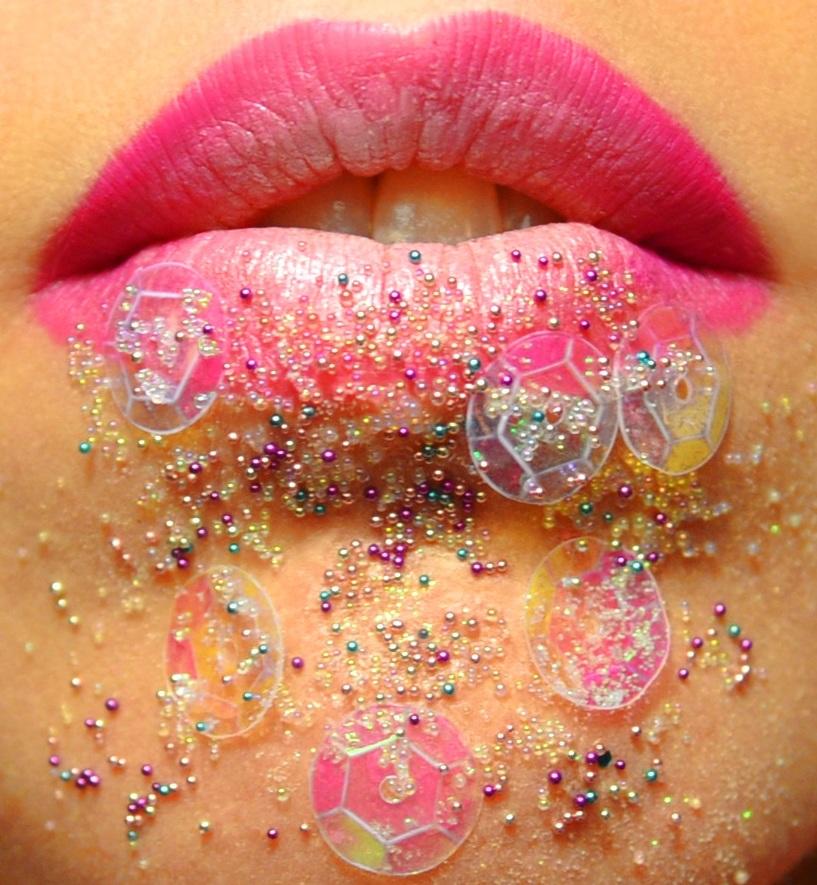 |
| My entry. |
I'd just like to add, that even if you don't think your work will be good enough, if you've put thought, time and effort in, believe in your work and do it anyway! I did, and it paid off, I've always been shy about entering competitions, but I've realized that you really don't have anything to loose, if it doesn't turn out how you hoped the chances are people will forget it, so there's no need to worry, you'll have learned something from the experience; and when it goes well, you'll be thankful for all the hard work you put in, it gives you such an amazing confidence boost, and the motivation to keep pushing forward :). I'm not saying that if you do something as an after thought, rush it and then think it's rubbish that it won't be, the chances are it probably is! The key is hard work, love and passion!
Anna :)
Here's a link to my facebook page and twitter account:
www.facebook.com/annabaxtermakeupartistry
https://twitter.com/AnnaRhiannon
Thursday, 10 January 2013
This is just a quick post that I thought the make-up junkies among you would appreciate! If like me you love your eyeliner (with or without 60's flicks) but can't seem to find one which doesn't budge and looks stunning. Then you should definitely try NARS Eyeliner Stylo, I love it!

It has a super fine felt tip, is really easy to apply and it's so stubborn it won't budge for anything less than your best eye makeup remover...so any forgetful eye rubbings wont matter! It comes in four different shades 'Carpates- Black'; 'Nuku Hiva - Brown'; 'Atlantic - Blue' and 'Koala - Grey'. It's £19.00 and well worth the money! I went for the black and I've posted a quick picture so you can see how well it goes on!

(Please excuse the lack of mascara! Tut tut)
(Please excuse the lack of mascara! Tut tut)
Monday, 7 January 2013
Clinique's Three Step Marvel...
For as long as I can remember my face has been an oil slick, which has resulted in a constant flow of spots and absolutely enormous pores, which in turn makes my skin look rougher and older than it actually is. I try almost anything I can get my hands on, but nothing reduced the oil and tightened my pores to any great effect, UNTIL I was doing a spot of make-up shopping in Debenhams and decided I was in the market for new skin care products and popped over to the Clinique counter...that's where I saw the 'Anti-blemish solutions' range which form a three step makeup regime. Perfect!
Needless to say I went away a happy bunny with a Clinique shaped dint in my purse.

The first of the three steps is the 'cleansing foam' - £14.50, this is lathered onto wet skin (AFTER all traces of makeup are removed), where it cleanses and removes dirt, excess oil and softens the dead skin cells on the surface of your skin.
The second step is the 'clarifying lotion' - £17.00, you need to shake this vigorously as it's full of tiny exfoliating particles, you only need a small amount on a cotton ball. The clarifying lotion removes all the dead skin cells which were softened during step one, and any excess oil or dirt left behind.
Removing the dirt and oil from the pores means that they can reduce in size, only slightly but it's noticeable!
The third step is a 'clearing moisturiser' - £18.50, (oil free, obvs) which acts as a barrier to bacteria and restores essential moisture (not oil!) to the skin.
I've only been using these for just over a week and I can all ready see a difference in my skin! I have fewer spots all ready, my skin is super soft and looks radiant, which is the result of removing all the dead skin cells and my pores are ever so slightly less noticeable. It's suggested that you use them twice a day, but I've seen results with only one use a day. Imagine what my skin will look like after a month!
Clinique Pore Refining Solutions Correcting Serum will be my next purchase!
Needless to say I went away a happy bunny with a Clinique shaped dint in my purse.
The first of the three steps is the 'cleansing foam' - £14.50, this is lathered onto wet skin (AFTER all traces of makeup are removed), where it cleanses and removes dirt, excess oil and softens the dead skin cells on the surface of your skin.
The second step is the 'clarifying lotion' - £17.00, you need to shake this vigorously as it's full of tiny exfoliating particles, you only need a small amount on a cotton ball. The clarifying lotion removes all the dead skin cells which were softened during step one, and any excess oil or dirt left behind.
Removing the dirt and oil from the pores means that they can reduce in size, only slightly but it's noticeable!
The third step is a 'clearing moisturiser' - £18.50, (oil free, obvs) which acts as a barrier to bacteria and restores essential moisture (not oil!) to the skin.
**They also have a smaller set which includes: 50ml Cleansing Foam; 100ml Clarifying lotion & 30ml Clearing Moisturiser for £30**
I've only been using these for just over a week and I can all ready see a difference in my skin! I have fewer spots all ready, my skin is super soft and looks radiant, which is the result of removing all the dead skin cells and my pores are ever so slightly less noticeable. It's suggested that you use them twice a day, but I've seen results with only one use a day. Imagine what my skin will look like after a month!
Clinique Pore Refining Solutions Correcting Serum will be my next purchase!
Subscribe to:
Posts (Atom)